
A code-along is a story about coding in which you are encouraged to “code up” all the examples in the story. In a code-along you should not cut-and-paste.
In this code-along we will explore how to create, in CanaryMod’s default Minecraft world, a simple house, parameterized on its width, depth, and height. We will build this house in two stages. In stage 1, we will develop a prototype LEGO artifact that we will view in LDD. LDD provides a relatively quick feedback loop for our development process (i.e., running a Bricklayer program and seeing the results in LDD happens fairly quickly). In addition, LDD is stateless. For example, if we do not like the way an artifact has turned out we can simply change the code in our Bricklayer program and run the program again. In LDD, the old artifact will disappear and the new artifact will appear in its place. This is not true when creating Bricklayer artifacts in Minecraft worlds. We will therefore take advantage of LDD’s rapid feedback loop and stateless nature in order to properly position, polish, and debug our artifact.
Once the prototype (LEGO) artifact is completed we will move to stage 2 of our development process. In this stage, we will do the following.
- Startup a Minecraft server using CanaryMod.
- Startup a Minecraft client.
- Connect the client to the server.
- Modify our Bricklayer program so that it produces a Minecraft artifact.
- Run the Bricklayer program in the traditional manner.
- Enter the Minecraft world and view the results.
Stage 1 – Use LDD to Create a Prototype Artifact
The Bricklayer program shown below creates a simple house consisting of (1) a hollow rectangular prism made of Stone, (2) a roof made of Glowstone, and (3) a OakDoor. This artifact is defined in a function called house which is parameterized on (1) the width of the house (xSize), (2) the height of the house (ySize), (3) the depth of the house (zSize), and (4) the location of the leftmost, bottom-most corner of the house.
open Level_4;

val dimensions = 64;

fun house xSize ySize zSize (x,y,z) =
    (
        putHollow (xSize,ySize,zSize) [Stone] (x,y,z);
        put (xSize,1,zSize) Glowstone (x,y+ySize-1,z);

        put (1,2,1) OakDoor (x+2,y+1,z)
    );

build(dimensions,dimensions,dimensions);

house 10 5 20 (10,0,10);

show "house";

Note that the function call house 10 5 20 (10,0,10) builds the house at (10,0,10) and not at (0,0,0). The reason for doing this is that we may later want extend our program so that the house has a yard which is surrounded by a fence.
Stage 2 – Creating a Bricklayer Artifact in Minecraft
Before runing a Bricklayer program that creates something in Minecraft, we must first start our CanaryMod server and connect to it. See the first code-along in this special project for detailed instructions on how to do this. The following screenshot shows the spawn-point for this example. It is here where Bricklayer will build our house.

With the exception of the showMC function call, the program below is identical to the program shown in Stage 1.
open Level_4;

val dimensions = 64;

fun house xSize ySize zSize (x,y,z) =
    (
        putHollow (xSize,ySize,zSize) [Stone] (x,y,z);
        put (xSize,1,zSize) Glowstone (x,y+ySize-1,z);

        put (1,2,1) OakDoor (x+2,y+1,z)
    );

build(dimensions,dimensions,dimensions);

house 10 5 20 (10,0,10);

showMC "house";
After running the program and entering our Minecraft world we see the following.

Our house is nowhere to be seen. This is not a bug. Recall that our house was not placed at Bricklayer’s origin, but rather it was place at (10,0,10). If we fly up we see the house a little ways away.

As we fly closer to the house we notice that trees seem to be growing out of the roof of the house. Trees are also growing right next to our house and even in front of the door.

Chopping away the trees we see that the floor of the house is above ground and there appears to be no door.
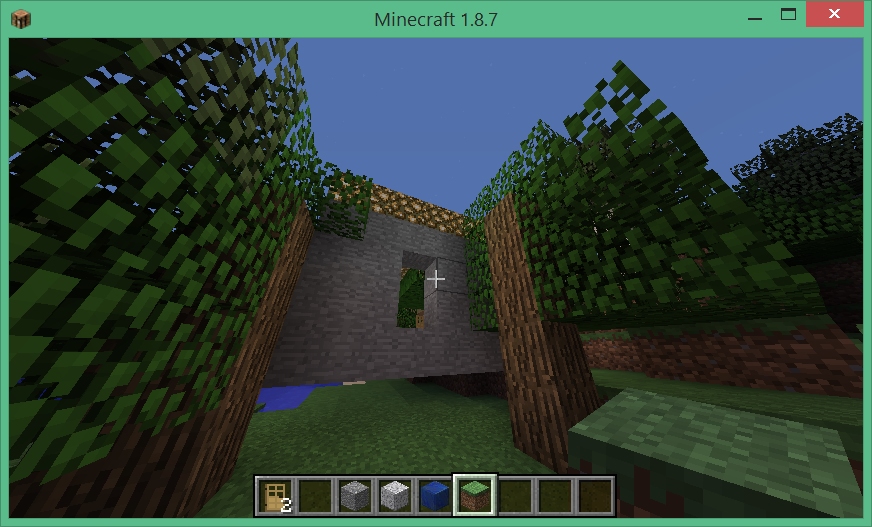 Entering our house confirms that trees are indeed growing through our house. We also see that our house contains grass blocks.
Stage 3 – Terraforming
In Stage 2 we saw that simply moving a Bricklayer artifact into a Minecraft world without any preparation can lead to undesirable results. In hindsight, we should have somehow cleared and leveled the terrain before building our house. What do to? First, let us “erase” our house. Bricklayer provides a function, called showAsAir, that will build an artifact in a Minecraft world out of Air blocks. When executed, the program below will replace the blocks of our house with Air blocks.
open Level_4;

val dimensions = 64;

fun house xSize ySize zSize (x,y,z) =
    (
        putHollow (xSize,ySize,zSize) [Stone] (x,y,z);
        put (xSize,1,zSize) Glowstone (x,y+ySize-1,z);

        put (1,2,1) OakDoor (x+2,y+1,z)
    );

build(dimensions,dimensions,dimensions);

house 10 5 20 (10,0,10);

showAsAir "house";
The result of erasing our house is shown below. Notice that parts of trees and grass blocks are missing from the remaining landscape. These missing parts (now air) are locations occupied by the floor, walls, and roof of our house.
 The easiest way to proceed at this point is to (1) clear away a rectangular prism the size of the house (or larger), and (2) place a rectangle out of grass (or some other block) on the ground, and (3) rebuild our house on this grass rectangle.
Clearing Land
The program below creates a rectangular prism the size of Bricklayer’s virtual space. Note that care needs to be taken when creating rectangular prisms to avoid creating artifacts that are too large. For example, the rectangular prism created below (which is unnecessarily large for our purposes) consists of 64x64x64 = 262,144 blocks.
open Level_4;

val dimensions = 64;

build(dimensions,dimensions,dimensions);

put (dimensions,dimensions,dimensions) Air (0,0,0);

showMC "rectangular prism";
(* showAsAir "rectangular prism"; would also work *)
The following screenshot shows the effects of creating our rectangular prism made out of Air. Notice how trees have been chopped of and a significant part of the mountain in the background has been removed.

Groundwork
We now want to cover the ground cleared away by our previous program with grass. It is on top of this grass that we will then build our house.
open Level_4;

val dimensions = 64;

build(dimensions,dimensions,dimensions);

put (dimensions,1,dimensions) Grass (0,0,0);

showMC "groundwork";
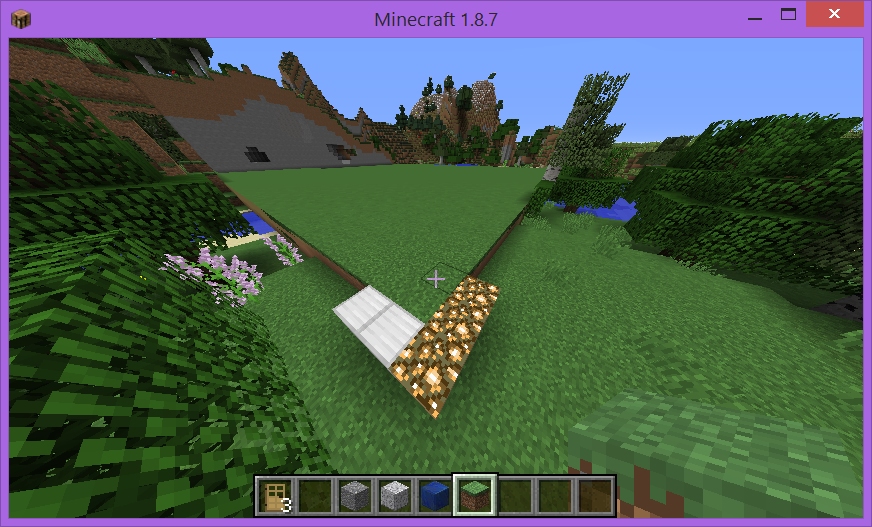
The following screenshot shows the effects of groundwork efforts. Note how the Glowstone-Iron blocks mark the origin and provide us with orientation. Also note that the grass is one block higher than the (natural) surrounding terrain. If we wanted to lower this grass rectangle we could accomplish this using the function call setBricklayerOrigin (0,~1,0).
Rebuilding our House
We are now in a position where we can rebuild our house by executing the code at the beginning of Stage 2. The code is included below for readability.
open Level_4;

val dimensions = 64;

fun house xSize ySize zSize (x,y,z) =
    (
        putHollow (xSize,ySize,zSize) [Stone] (x,y,z);
        put (xSize,1,zSize) Glowstone (x,y+ySize-1,z);

        put (1,2,1) OakDoor (x+2,y+1,z)
    );

build(dimensions,dimensions,dimensions);

house 10 5 20 (10,0,10);

showMC "house";
The following screenshot shows the result of rebuilding our house.

As we near our house, we note that (1) the door is in place, and (2) the stone floor of the house is as the same level as the outside grass. Note that since our house is parameterized on its width depth and height, we can erase our house and build a larger one in its place.

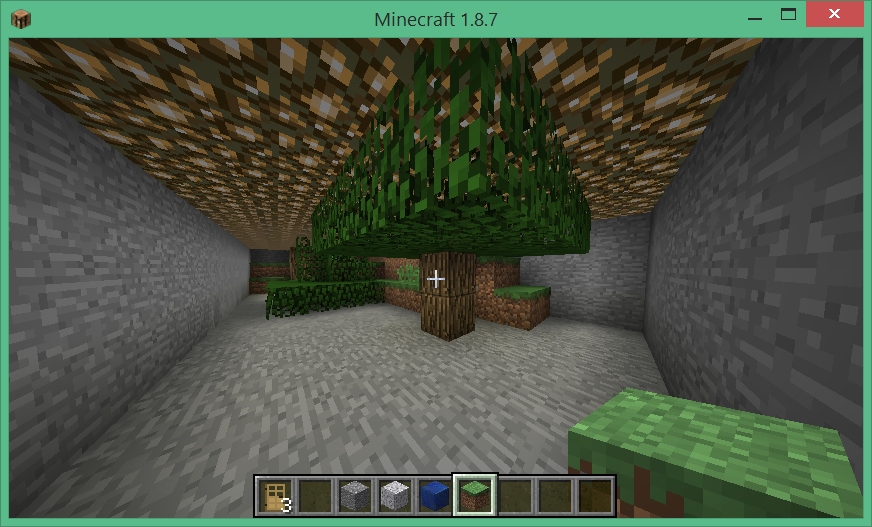
We conclude this code-along by showing a screenshot of the interior of our house.
