Overview
Level 1 is the first coding level in Bricklayer. It is here where you will learn to write your first Bricklayer program. Level 1 programs are composed of functions that are provided by the Bricklayer Level_1 graphics library. To properly use these graphics functions, one needs to understand the following:
- the Cartesian coordinate system – to learn more about this do the Vitruvia exercises for concept 1

- relative positioning – to learn about how varaibles can be used to define coordinates relative to other coordinates do the Vitruvia exercises for concept 2.
- Bricklayer’s conventions for positioning LEGO bricks in the Cartesian coordinate system – to learn more about this do the Vitruvia exercises for concept 3 and concept 4.
- examples of “put-functions” provided by the Level_1 library and how to use them – to learn more about put-functions do the Vitruvia exercises for concept 5 , concept 6, and concept 7
Coding Environments
Bricklayer level 1 programs can be created using two program development environments: (1) Bricklayer-lite, and (2) the BricklayerIDE.
Bricklayer-lite is a visual web-based programming environment where Bricklayer Level_1 functions are represented as puzzle pieces which are also referred to as blocks. These blocks can be snapped together to form a program. We will refer to these block-based programs as Bricklayer-lite programs. To write a program in Bricklayer-lite click here.
The BricklayerIDE is a traditional text-based programming environment in which programs are developed using a text editor. We will refer to these text-based programs as Bricklayer programs. To run a Bricklayer program one must first download and install software. There are 2 operating systems on which this software can be installed: Windows and MAC-OS. For more information on how to download and install the Windows software click Windows download. For more information on how to download and install MSC-OS software click MAC-OS download.
The Structure of a Level_1 Program
Regardless of whether one is creating a program using Bricklayer-lite or the BricklayerIDE, the structure of all level 1 programs will conceptually be the same. All level 1 programs begin with a declaration that tells the computer to use the Level_1 library.
| Bricklayer-Lite | BricklayerIDE |
 |
open Level_1 ; |
The second line in a level 1 Bricklayer program is a function call that tells the computer the size of the virtual baseplate on which bricks will be placed. There are many choices possible. A typical option is to create a virtual baseplate having the size of the standard LEGO baseplate, whose dimensions are 32×32.
| Bricklayer-Lite | BricklayerIDE |
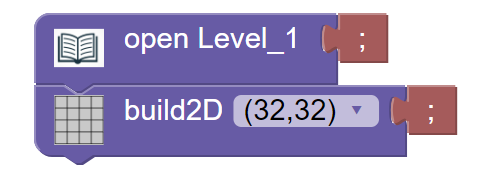 |
open Level_1; build2D (32,32) ; |
After the virtual baseplate has been created zero or more put-functions can be called to place bricks on the virtual baseplate. It is through these put function calls that LEGO artifacts are created. After an artifact has been created (via put function calls) a Bricklayer program must then tell the computer which software should be used to display the results. For programs that have been created using Bricklayer-Lite, artifacts will be displayed in the web browser. For programs that have been created using the BricklayerIDE, there are several options available. The default option (which we discuss here) is to display the artifact using LEGO Digital Designer (LDD). The level 1 Bricklayer function that instructs the computer to display a Bricklayer artifact is called show2D. This function is given a quoted string as its parameter. Inside the quotes you can write anything you like (except for other nested quotes or newline characters). The purpose of this string is to provide a human readable description of the artifact.
| Bricklayer-Lite | BricklayerIDE |
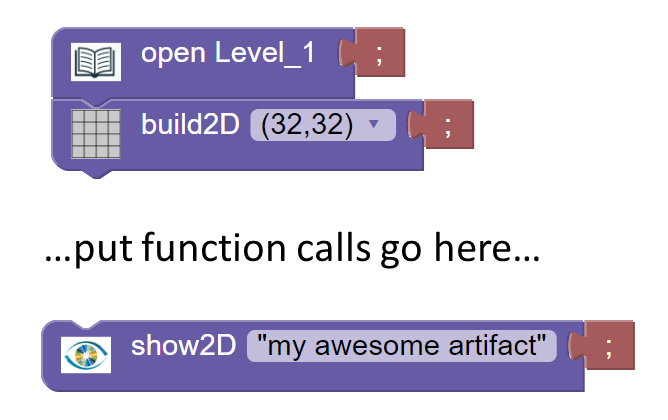 |
open Level_1 ; build2D (32,32);… put function calls go here … show2D “my awesome artifact” ; |
Coding Example 1
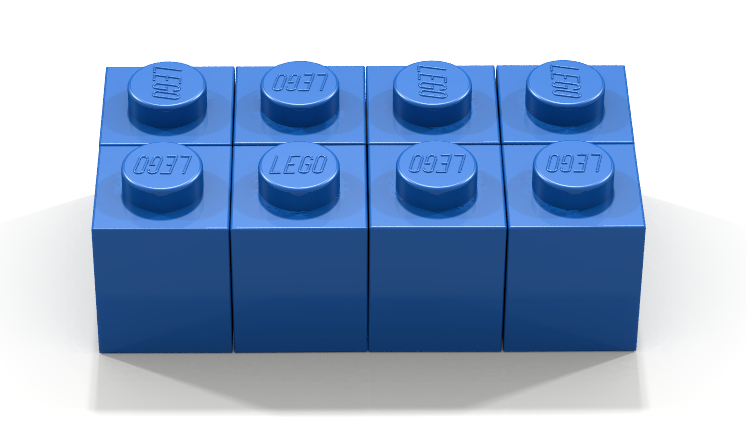
In this example we will look at a Bricklayer-lite program and a Bricklayer program whose execution creates a 4×2 blue LEGO brick, shown below.
A Bricklayer-Lite Program
When executed the Bricklayer-lite program shown below will create a 4×2 blue LEGO brick whose lower left corner is positioned at the origin, i.e., the coordinates (0,0). In Bricklayer, the lower left corner of a rectangular brick is known as the brick’s reference point. All put-functions expect to be given a brick’s reference point as their input.

A Bricklayer Program
When executed the Bricklayer program shown below will create a 4×2 blue LEGO brick whose lower left corner is positioned at the origin, i.e., the coordinates (0,0). In Bricklayer, the lower left corner of a rectangular brick is known as the brick’s reference point. All put-functions expect to be given a brick’s reference point as their input.
open Level_1;

build2D (32,32);

put2D_4x2_BLUE (0,0);

show2D "a 4x2 blue LEGO brick";
Coding Example 2
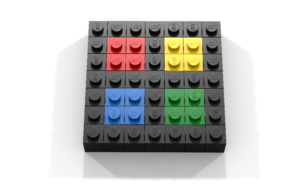
In this example we will look at a Bricklayer-lite program and a Bricklayer program whose execution creates the artifact shown below. Note that this pictoral description of the artifact allows for some flexibility regarding its position on a baseplate.
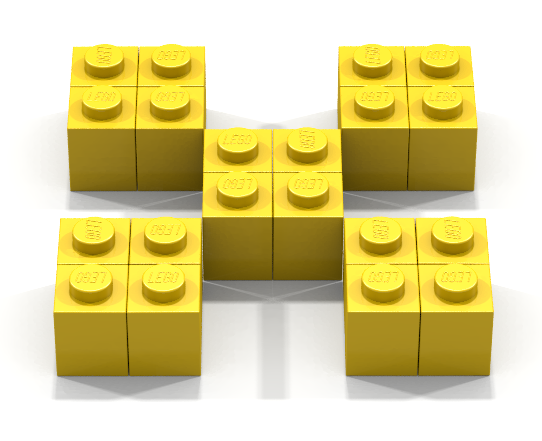
The artifact in this example is composed of five 2×2 yellow bricks. The level 1 library provides a put-function capable of creating a 2×2 yellow brick. Thus, using the level 1 library, it is possible to create the artifact shown above using five put-function calls. We now need to determine the reference points for each of these five 2×2 yellow bricks, which we will then provide as input coordinates for the corresponding five put-function call.s As part of our design, we can decide that the reference point of the artifact’s lower left 2×2 yellow brick should be at the origin. That is, the coordinates (0,0). After making this decision (i.e., pinning down this information), the next step is to determine the reference points of the remaining four 2×2 yellow bricks. This problem can be solved in a variety of ways including: (1) counting – count by hand from the origin to each of the desired coordinates, (2) calculation – use mathematical reasoning to calculate the coordinates, and (3) prototyping – sketch out the artifact on a sheet of graph paper and then determine the coordinates of the desired cells.
Using the Grid to create a Prototype
Oftentimes it is beneficial to use the Bricklayer Grid app to create a sketch or prototype of an artifact before one begins coding. The Grid is essentially an electronic form of graph paper with a rich set of features. To view the Grid click here.
Shown below is a 6×6 grid in which (left) mouse clicks have been used to create a prototype of the artifact we wish to code. Notice that integers run along both the vertical and horizontal axis. This information can be used to quickly determine the coordinates of any cell in the grid. Also notice that (unlike physical graph paper) the grid has undo and redo buttons that can un/redo the mouse clicks that resulted in filling cells with the selected color. So if you make one or more mouse-click mistakes, you can undo them rather than starting over from the beginning.
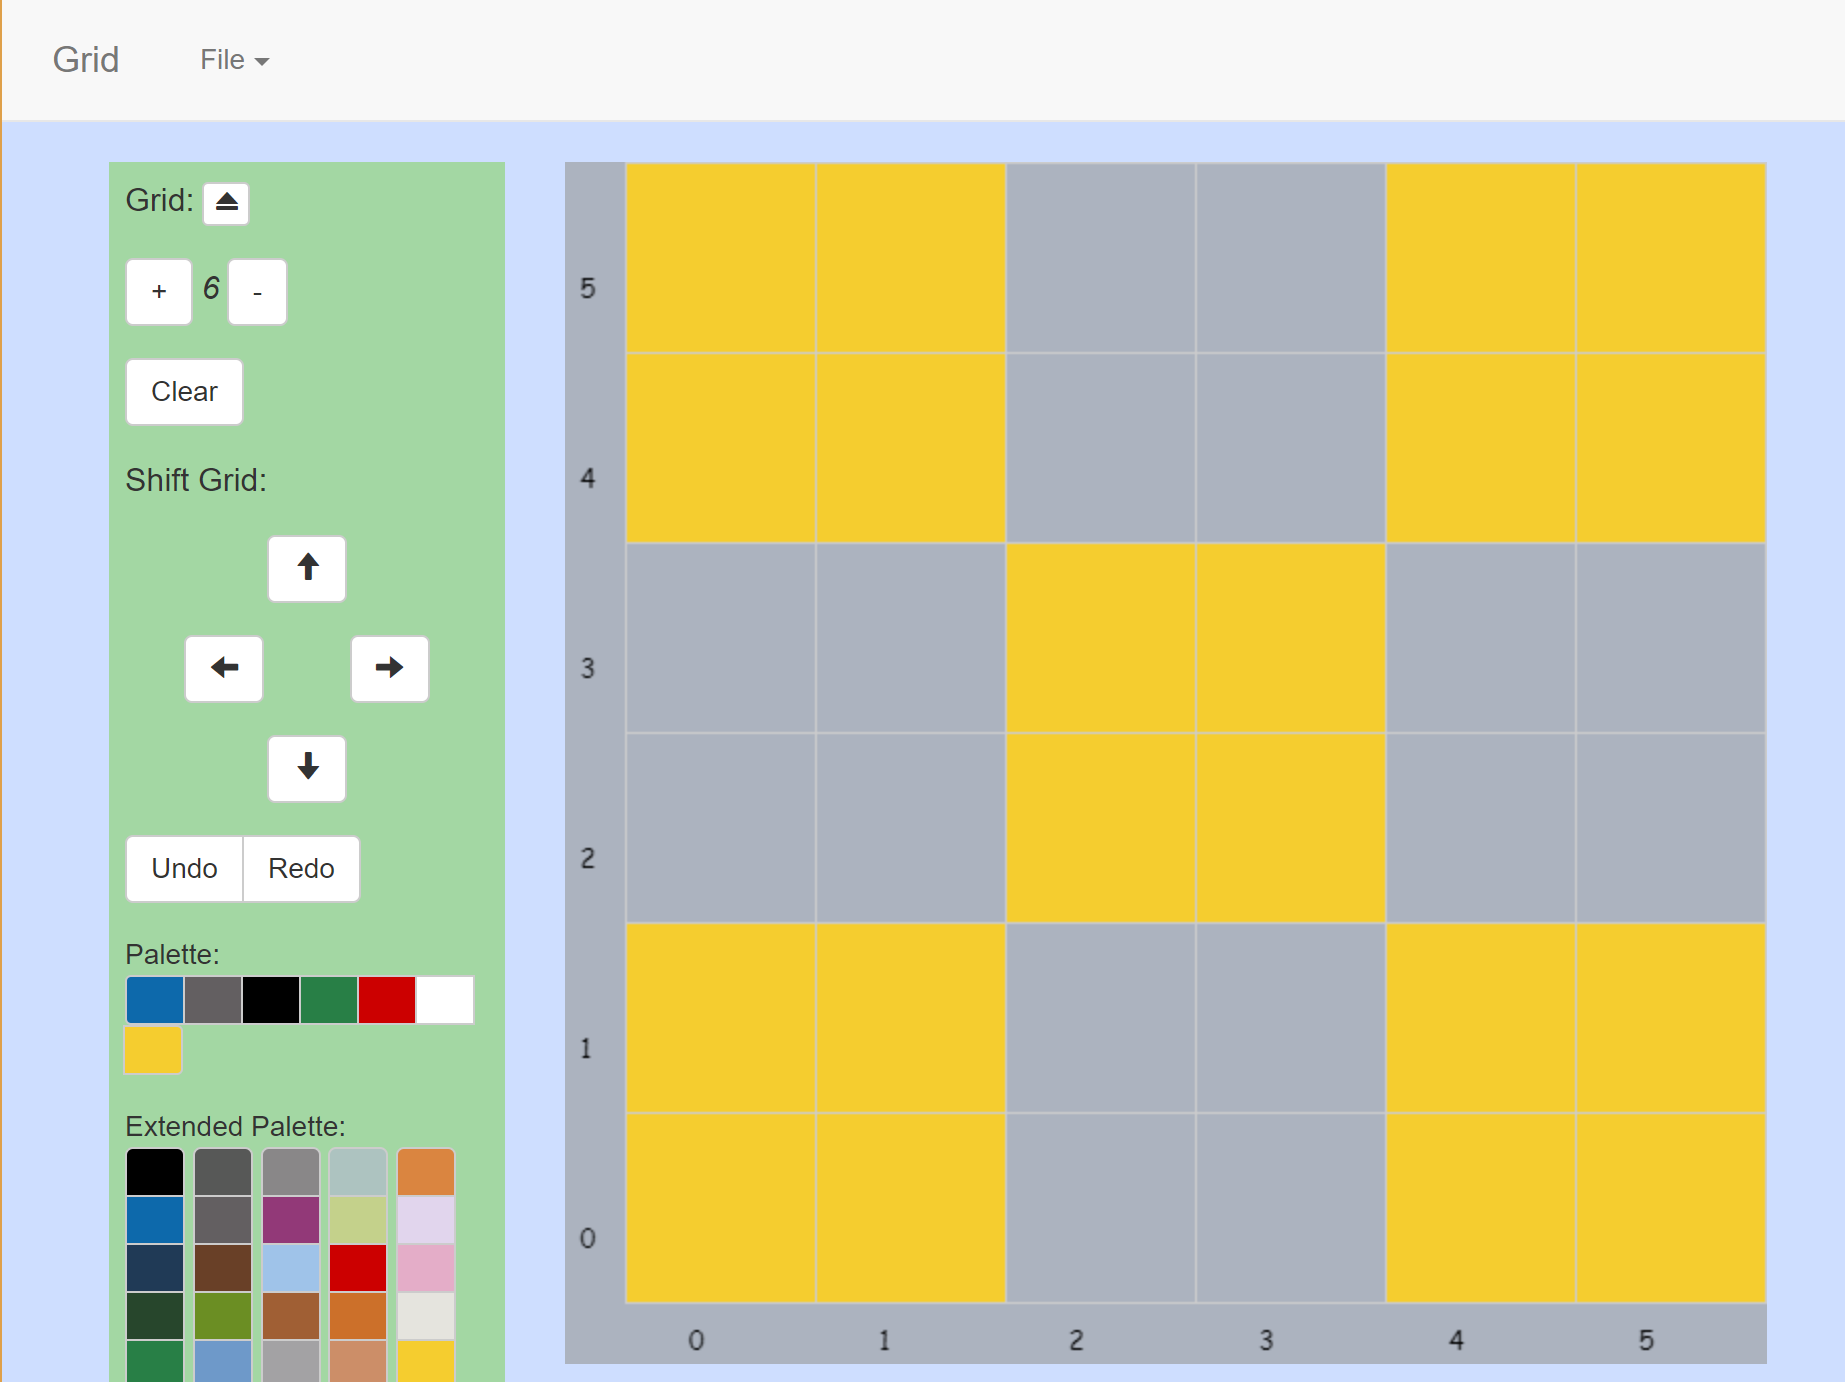
From reading the Grid we can see that the reference points of the five 2×2 bricks are: (0,0), (4,0), (4,4), (0,4) and (2,2). These coordinates will be the actual parameters (i.e., the inputs) to out five put-function calls.
A Bricklayer-Lite Program
When executed the Bricklayer-lite program shown below will create the artifact described in this example.

A Bricklayer Program
When executed the Bricklayer program shown below will create the artifact described in this example.
open Level_1;

build2D (32,32);

put2D_2x2_YELLOW (0,0);
put2D_2x2_YELLOW (4,0);
put2D_2x2_YELLOW (4,4);
put2D_2x2_YELLOW (0,4);
put2D_2x2_YELLOW (2,2);

show2D "five";
Coding Exercise Concept 5 – 01
| Prerequisite Concepts | 1, 3, & 4 |
| Key Concept | 5 |
| Solution |
Before building this artifact it is recommended that you complete all Vitruvia exercises for Concept 5.
Write a Bricklayer program that builds the following LEGO artifact.

Coding Exercise Concept 6 – 01
| Prerequisite Concepts | 1, 3, 4 & 5 |
| Key Concepts | 2 & 6 |
| Solution |
Before building this artifact it is recommended that you complete all Vitruvia exercises for Concept 6.
Write a Bricklayer program that builds the following LEGO artifact.

Coding Exercise Concept 6 – 02
| Prerequisite Concepts | 1, 3, 4 & 5 |
| Key Concept | 6 |
Before building this artifact it is recommended that you complete all Vitruvia exercises for Concept 6.
Write a Bricklayer program that builds the following LEGO artifact.

Coding Exercise Concept 6 – 03
| Prerequisite Concepts | 1, 3, 4 & 5 |
| Key Concept | 6 |
Before building this artifact it is recommended that you complete all Vitruvia exercises for Concept 6.
Write a Bricklayer program that builds the following LEGO artifact.

Coding Exercise Concept 7 – 01
| Prerequisite Concepts | 1, 3, 4, 5, 6 |
| Key Concept | 7 |
Before building this artifact it is recommended that you complete all Vitruvia exercises for Concept 7.
Write a Bricklayer program that builds the following LEGO artifact.

Coding Exercise Concept 7 – 02
| Prerequisite Concepts | 1, 3, 4, 5, 6 |
| Key Concept | 7 |
Before building this artifact it is recommended that you complete all Vitruvia exercises for Concept 7.
Write a Bricklayer program that builds the following LEGO artifact.

Coding Exercise Concept 7 – 03
| Prerequisite Concepts | 1, 3, 4, 5, 6 |
| Key Concept | 7 |
Before building this artifact it is recommended that you complete all Vitruvia exercises for Concept 7.
Write a Bricklayer program that builds the following LEGO artifact.

Coding Exercise Concept 7 – 04
| Prerequisite Concepts | 1, 3, 4, 5, 6 |
| Key Concept | 7 |
Before building this artifact it is recommended that you complete all Vitruvia exercises for Concept 7.
Write a Bricklayer program that builds the following LEGO artifact.

Coding Exercise Concept 7 – 05
| Prerequisite Concepts | 1, 3, 4, 5, 6 |
| Key Concept | 7 |
Before building this artifact it is recommended that you complete all Vitruvia exercises for Concept 7.
Write a Bricklayer program that builds the following LEGO artifact.

Coding Exercise Concept 7 – 06
| Prerequisite Concepts | 1, 3, 4, 5, 6 |
| Key Concept | 7 |
Before building this artifact it is recommended that you complete all Vitruvia exercises for Concept 7.
Write a Bricklayer program that builds the following LEGO artifact.

Coding Exercise Concept 7 – 07
| Prerequisite Concepts | 1, 3, 4, 5, 6 |
| Key Concept | 7 |
Before building this artifact it is recommended that you complete all Vitruvia exercises for Concept 7.
Write a Bricklayer program that builds the following LEGO artifact.
![]()
Coding Exercise Capstone
| Prerequisite Concepts | 1, 3, 4 |
| Key Concept | 5, 6, 7, & 9 |
Before attempting this project it is recommended that you complete all Vitruvia exercises associated with Level 1 and that you also complete all Level 1 coding projects for concepts 5, 6, 7, and 9. For the Level 1 capstone you should build a LEGO artifact based on a pixel art image. If you search online for Pixel Art you will find many many images. Keep in mind that in Level 1 there are a limited number of brick colors available. And finally, the artifact you build should contain at least 100 bit-bricks. Figure 1 is a rendition of Ash Ketchum from Pokemon. Figure 2 is a LEGO rendition of Red from the game Angry Birds. Feel free to use these for your project, or find your own pixel art image on the web.

Figure 1 – Ash Ketchum (146 bricks).

Red (378 bricks)