A code-along is a story about coding in which you are encouraged to “code up” all the examples in the story. In a code-along you should not cut-and-paste.
In this code-along, we will explore how to translate a specification (in condensed notation) of a Bricklayer fabric into an implementation (i.e., a Bricklayer program) that, when executed, creates the specified fabric.
The Specification of a Bricklayer Fabric
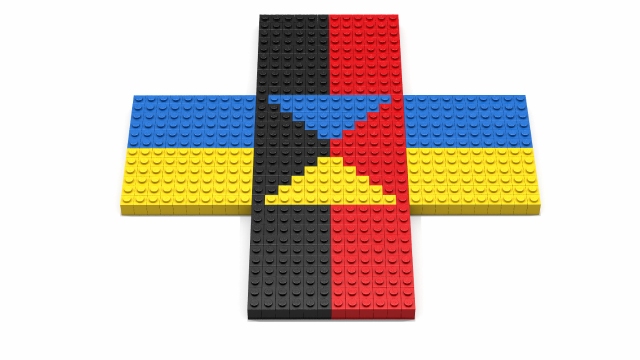
The fabric specification implemented in this code-along use a base-pattern which consists of four lines: 2 horizontal and 2 vertical. This pattern is repeated 6 times to create the fabric. During each iteration of the pattern each line moves further away from its initial central position. The first line moves up, the second line moves down, the third line moves to the right, and the fourth line moves to the left. The formal specification of this fabric is given below.
| Line Segment Name | Line Segment Specifics | |
| line1 | = | (0,16) (31,16) BLUE |
| line2 | = | (0,15) (31,15) YELLOW |
| line3 | = | (16,0) (16,31) RED |
| line4 | = | (15,0) (15,31) BLACK |
0
Attempt 1
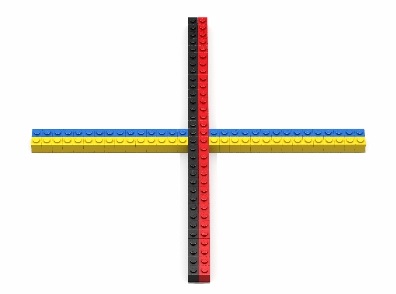
The program shown below represents an initial attempt to construct a portion the specified fabric. Specifically, the fabric created by this program consists of (one iteration of) the base pattern. Note that the boundary position (e.g., 31) is a are hard-coded constant. Such hard-coded constants will make it difficult to create a larger similar fabric.
open Level_3;

fun weave b1 b2 b3 b4 =
     (
        (* ==============base-pattern============== *)
        (* horizontal *)
        lineXZ (0,16) (31,16) b1;
        lineXZ (0,15) (31,15) b2;

        (* vertical *)
        lineXZ (16,0) (16,31) b3;
        lineXZ (15,0) (15,31) b4
    );

build2D(32,32);

weave BLUE YELLOW RED BLACK;

show2D "Traditional Weave";
Attempt 2
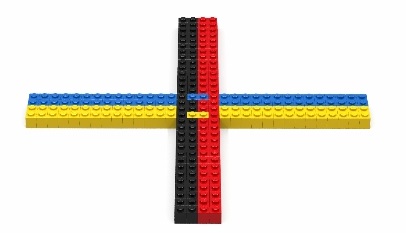
The code in this attempt creates a fabric consisting of two iterations of the base-pattern. Notice the weaving pattern is starting to emerge. From the standpoint of the implementation, it is worth noting that the upper boundary position is now a parameter to the weave function. This will enable the size of the fabric to be easily changed. Furthermore, note that the increments/decrements associated with each iteration are explicitly written out (e.g., 16+0). This highlights the similarities (as well as differences) between the first and second iterations.
Limitations of the current implementation include: (1) the hard-coded positional values 15 and 16, and (2) code redundancy between iterations. The drawback of hard-coding positional values is that moving the fabric to a different location in the virtual space requires the changing of numerous positional constants.
open Level_3;

fun weave b1 b2 b3 b4 max =
    (
        (* ==============iteration 1============== *)
        (* horizontal *)
        lineXZ (0,16+0) (max,16+0) b1;
        lineXZ (0,15-0) (max,15-0) b2;

        (* vertical *)
        lineXZ (16+0,0) (16+0,max) b3;
        lineXZ (15-0,0) (15-0,max) b4;

        (* ==============iteration 2============== *)
        (* horizontal *)
        lineXZ (0,16+1) (max,16+1) b1;
        lineXZ (0,15-1) (max,15-1) b2;

        (* vertical *)
        lineXZ (16+1,0) (16+1,max) b3;
        lineXZ (15-1,0) (15-1,max) b4
    );

build2D(32,32);

weave BLUE YELLOW RED BLACK 31;

show2D "Traditional Weave";
Final Version
The final version of the code that implements the fabric is shown below. Note that a function, called pattern, has been introduced for creating instances of the fabric’s base-pattern. This function is parameterized on an integer value, called delta. When called with a specific value for delta, the function pattern creates an instance of the base-pattern in which all lines in the pattern are accordingly incremented/decremented by delta.
The function weave has two additional parameters: x/z, which represents a parameterization of the x/z value’s occurring in the definintions of each of the lines. Also note, that the different values of x/z (i.e., 15 and 16) are expressed as a function of the paramenter x/z (e.g., x and x-1). Adding x and z to the function weave enables the “center” of the weave pattern to be placed anywhere in the xz-plane, provided the max value and the dimensions of the virtual space are adjusted accordingly.
Two drawbacks of this implementation are: (1) the value of the lower boundary, 0, is still hard-coded, (2) the connection (size = max + 1) between max and the size of the virtual space is implicit. However, the most significant drawback is the fact that the fabric is created by calling the function pattern six times! At a higher coding level we will see that such simple repetitions of code can be easily and compactly expressed using functions having a loop-like behavior.
open Level_3;

fun weave b1 b2 b3 b4 max x z =
    let
        fun pattern delta =
            (
                (* horizontal *)
                lineXZ (0,z+delta  ) (max,z+delta  ) b1;
                lineXZ (0,z-1-delta) (max,z-1-delta) b2;

                (* vertical *)
                lineXZ (x+delta,0  ) (x+delta  ,max) b3;
                lineXZ (x-1-delta,0) (x-1-delta,max) b4
            );
    in
        pattern 0;
        pattern 1;
        pattern 2;
        pattern 3;
        pattern 4;
        pattern 5
    end;

build2D(32,32);

weave BLUE YELLOW RED BLACK 31 16 16;

show2D "Traditional Weave";