
A code-along is a story about coding in which you are encouraged to “code up” all the examples in the story. In a code-along you should not cut-and-paste.
This code-along continues from point where our previous code-alone left off. Specifically, in the previous code-along we selected in our Minecraft world a location (i.e., a plot of land) where we will build Bricklayer artifacts. We then used the Bricklayer functions setSpawnPoint and setMinecraftOrigin set Bricklayer’s minecraftOrigin to coincide with the location of the lower-left corner of our plot of land.
In this code-along we will level the plot of land we had chosen in our previous code-along, and then build (at ground level) a square island surrounded by a (square) lava-filled moat. It is worth mentioning that the top of the moat will be at ground level. What this means is that we will be embedding our moat into the ground (i.e., our Bricklayer origin will be underground).
Step 1 – Level plot of land.
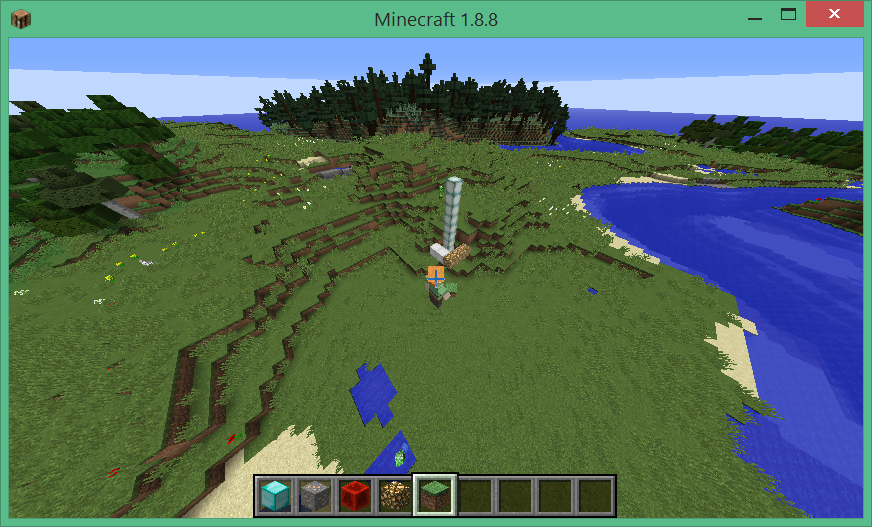
The screenshot below shows a third-person view of our plot of land. The base of the SeaLantern post is located at the (current) Bricklayer origin. In this step, our goal is to clear a 64×64 piece of land whose lower-left corner is the Bricklayer origin.
The program below builds a 64x30x64 rectangular prism made out of blocks of Air and puts this rectangular prism at the Bricklayer origin.
open Level_4;

val spawnPoint      = (~172,62,256);
val minecraftOrigin = (~330,64,~12);

build(64,64,64);

setSpawnPoint      spawnPoint;
setMinecraftOrigin minecraftOrigin;

put (64,30,64) Air (0,0,0);
setPlayerOffset   (~3,5,~3);

showMC "Level plot of land";
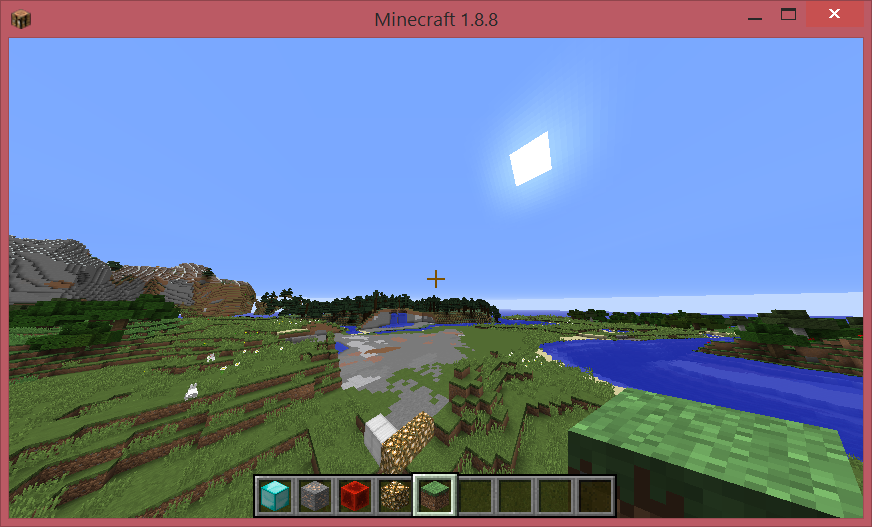
The following screenshot shows the result of clearing (excavating) our plot of land.
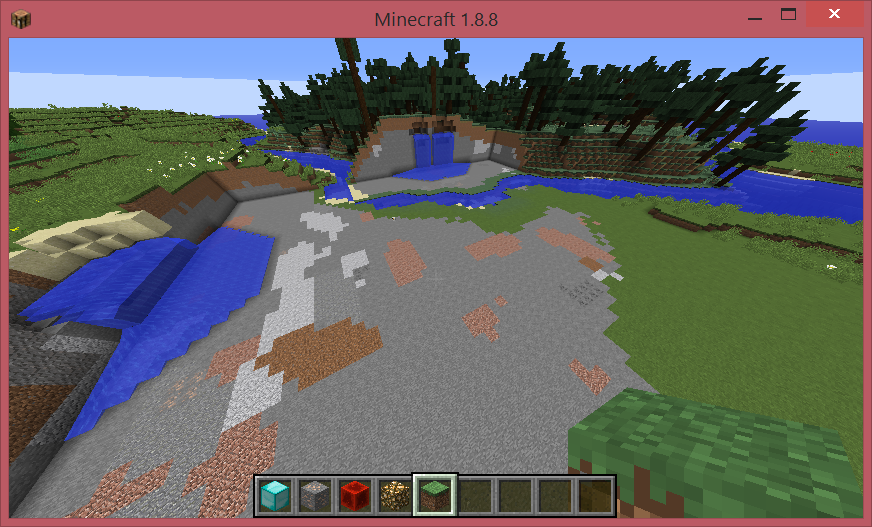
A closer view of our excavation is shown in the screenshot below. Note that in three places, where we have cut into hills, water is now flowing onto our excavated plot of land. If we build a ground-level lava-filled moat at this site, then water will flow into the moat and onto the lava. If we do not want this to be the case, then we would need to construct some form of retaining wall to block the water. It is not difficult to write a Bricklayer function that accomplishes this. However, in this code-along we will consider water flowing into our lava-filled moat to be acceptable.
Step 2 – Develop prototype.
In this step, we use LDD to develop a protoype of our “island surrounded by a lava-filled moat” artifact. In the code below, our artifact is parameterized on the size of the island, the size of the side of the moat, and the depth of the moat. It is important to note that the excavation for the moat creates a rectangular prism from blocks of Air. This takes advantage of the fact (i.e., assumes) that Bricklayer maps the Air block to the EMPTY piece. If this were not the case (e.g., if the Air block was mapped to the CLEAR brick), then the number of pieces in the resulting prototype would present display challenges for LDD. Of course, in such a case one could simply reduce the size of the prototype by reducing the values bound to the variables islandSide, moatSide, and moatDepth. Another possibility (which will be discussed in the next code-along) is to assure that Bricklayer will map an Air block to the EMPTY piece by explicitly defining it to be so.
In the program below, the code relating to the Minecraft spawn point, Minecraft origin, Bricklayer origin, and player position serve no purpose. When viewing artifacts using LDD this Minecraft-centric information is ignored. The only reason for including this code at this time is that now have a single program that lets us seamlessly transition between building our artifact in LDD and building it in Minecraft. All we need do to switch from LDD to Minecraft is to change the show function call.
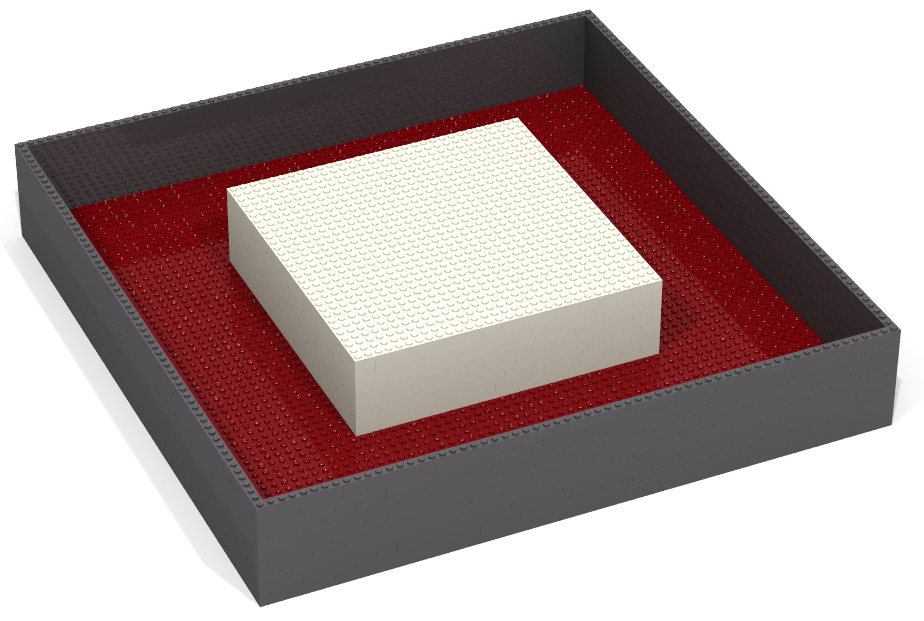
The rest of the program is pretty straightforward: First, the area where we will place our moat is excavated through a rectangular prism of Air blocks. Next the floor and walls of our moat are created (overwriting some of the Air blocks placed by our excavation). Then, the moat is filled (1 block deep) with Lava blocks (again overwriting some of the Air blocks placed by our excavation), and finally, an island is placed in the middle of the moat (again overwiting Air blocks). Note that this resulting artifact exists in the virtual space and is output in its entirety to LDD (or Minecraft).
open Level_4;

val islandSide = 31;
val moatSide   = 63;
val moatDepth  = 10;

fun artifact side depth islandSide (x,y,z) =
  let
    fun excavate () =
         put (side,depth,side) Air (x,y,z);

    fun moat () =
         (
           putHollow (side,depth,side)
                     [Bedrock]
                     (x,y,z);
           (* erase top of moat *)
           put (side,1,side) Air (x,y+depth-1,z)
         );

    fun lava () = put (side-2,1,side-2)
                      Lava
                      (x+1,y+1,z+1);

    fun island (x,y,z) =
          putHollow (islandSide,depth-1,islandSide)
                    [Quartz]
                    (x,y,z);

    val offset = (side - islandSide) div 2
  in
    excavate ();
    moat();
    lava();
    island(x+offset,y,z+offset)
  end;

val spawnPoint       = (~172,62,256);
val minecraftOrigin  = (~330,64,~12);
val bricklayerOrigin = (0,~10,0);

build(64,64,64);

setSpawnPoint      spawnPoint;
setMinecraftOrigin minecraftOrigin;
setBricklayerOrigin bricklayerOrigin;
setPlayerOffset   (~3,15,~3);

artifact moatSide moatDepth islandSide (0,0,0);

show "An island surrounded by a lava-filled moat.";
Step 3 – Build final form in Minecraft world.
We now build our artifact in our Minecraft world. All we need to do is change, in the previous program, the function show to showMC. However, technically speaking, it is in this step where we would normally add Minecraft-centric information to our Bricklayer program (e.g., setSpawnPoint, setMinecraftOrigin, setBricklayerOrigin, and setPlayerOffset).
In this code-along, the spawnPoint and minecraftOrigin are the same as those of the previous code-along. However, in this code-along, we introduce a new Bricklayer function, called setBricklayerOrigin which can be used to define the Bricklayer origin in terms of an offset from the minecraftOrigin.
The table below gives an example showing how the function setBricklayerOrigin can be used to position the Bricklayer origin, which we will refer to as bricklayerOrigin, 10 blocks below the minecraftOrigin. An equivalent effect could have been achieved by directly lowering the y-value of minecraftOrigin from 64 to 54. However, we believe it is conceptually cleaner to leave the minecraftOrigin fixed for the duration of a construction project and only change the bricklayerOrigin.
| Minecraft origin ≠ Bricklayer origin | Minecraft origin = Bricklayer origin |
| setSpawnPoint (~172,62,256); setMinecraftOrigin (~330,64,~12); setBricklayerOrigin (0,~10,0); “build some thing”; |
setSpawnPoint (~172,62,256); setMinecraftOrigin (~330,54,~12); “build some thing”; |
Note that since bricklayerOrigin is an offset, not an absolute location (like minecraftOrigin), the differences between the Bricklayer and Minecraft coordinate systems can be hidden from the user. In particular, the fact that North corresponds to the direction of the positive z-axis in Bricklayer while in Minecraft, North corresponds to the direction of the negative z-axis.
Example. Suppose we want to build a village (or a city) consisting of a number of houses. Suppose that we have a number of files containing Bricklayer programs. Each file contains a Bricklayer program that, when executed, builds a neighborhood in our village. Further suppose that, individually, each Bricklayer program builds its prototype neighborhood at the Bricklayer origin (0,0,0). When assembling the neighborhoods in our Minecraft world we will encounter situations where one neighborhood needs to placed “to the North of” another neighborhood. For example, suppose neighborhood B is to be placed 50 blocks further North of neighborhood A.
In the coordinate system of Bricklayer, this shift could be accomplished by (1) incrementing the z value of the position of neighborhood B by 50, or (2) through the use of an offset within Bricklayer which also increments the z value by 50.
Now suppose one wanted to accomplish this same shift by changing the (absolute) value of the minecraftOrigin and then building neighborhood B. However, to achieve a positve z-axis shift from the perspective of the Bricklayer coordinate system the minecraftOrigin would require a corresponding negative shift along the z-axis of the minecraftOrigin. Note that it is only the z-axis shifts that have this “sign inversion” property. When shifting along the x-axis or the y-axis, the coordinate systems of Bricklayer and Minecraft align.
The (re)positioning Bricklayer artifacts in a Minecraft world though changes to the bricklayerOrigin shields the programmer from having to keep track of the differences between the Bricklayer-Minecraft coordinate systems.
The following screenshots show, from a third-person perspective, the result of constructing the “island surrounded by a lava-filled moat” artifact on our selected plot of land. Note how the water is flowing onto the lava in our moat.

