
A code-along is a story about coding in which you are encouraged to “code up” all the examples in the story. In a code-along you should not cut-and-paste.
In this code-along we will explore how to (1) use the F3 function key to find out information about your avatar’s position in a Minecraft world, (2) write a small Bricklayer program that, when executed, will allow us to determine the spawn point associated with your Minecraft avatar, and (3) build a Bricklayer artifact at any location in a Minecraft world.
Step 1 – Entering a Minecraft world.
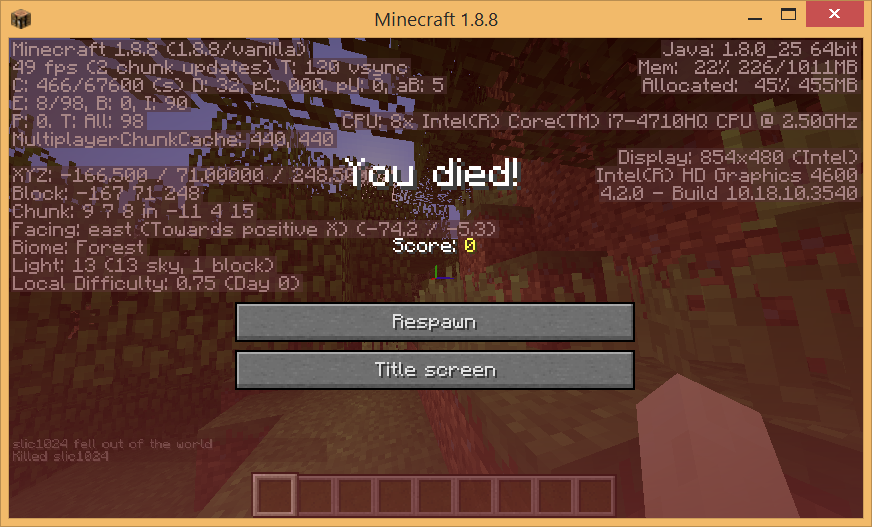
The screenshot below shows our avatar’s entry point into our Minecraft world. In general, there are two ways for an avatar to enter a Minecraft world: (1) by joining a Minecraft world using a Minecraft client, and (2) respawning after an avatar has died (e.g., the command /kill will “kill” your avatar and give you the option to respawn it).

While in your Minecraft world, hit the F3 function key (just above the number 3 on your keyboard). You should now see something similar to what is shown below. Of particular interest to us in this code-along is the Block data (just below the XYZ data) and the Facing data. In this screenshot, the Block data is (~116,75,265). This is the location of the block on which our avatar is standing. Note that our avatar is Facing East in the direction of the positive x-axis.
 It is worth noting that your avatar will not enter a Minecraft world at exactly the same location every time. In practice, when your avatar enters a world, it will be in a slightly different location from the last time it entered the world.
While in your Minecraft world, type /kill (i.e., slash-kill) and hit the carriage return. You should see something similar to the screenshot shown below. Click on the Respawn button.
 The screenshot shown below shows the data associated with the reentry of our avatar into the Minecraft world. Note that our avatar is in a slightly different location and is facing South – in the direction of the positive(?) z-axis (more on this orientation issue in the next code-along).

Step 1 – Finding the exact coordinate of the spawn point.
In a Minecraft world, an avatar is permanently assigned a fixed location called a spawn point. When an avatar enters a Minecraft world, it is placed near its spawn point. Note that while it is possible (by sleeping in a bed) to change our avatar’s entry point into a Minecraft world, it is nevertheless not possible (from the perspective of Bricklayer) to change the avatar’s spawn point.
Initially, the origin (0,0,0) of Bricklayer’s virtual space corresponds to the spawn point of our Minecraft world. For reasons that we will discuss shortly, it is useful (though not absolutely necessary) for us to determine the exact spawn point associated with our avatar.
The Bricklayer program shown below puts a tower of SeaLanterns at the spawn point. The SeaLantern at the base of this tower is the spawn point of our avatar.
open Level_4;
build(8,8,8);

put (1,5,1) SeaLantern (0,0,0);

showMC "Exact spawn point";
As the sceenshot below shows the entry point for our avatar is underground (scary). From this underground entry point we need to find the Block data for the lowest SeaLantern in our tower.
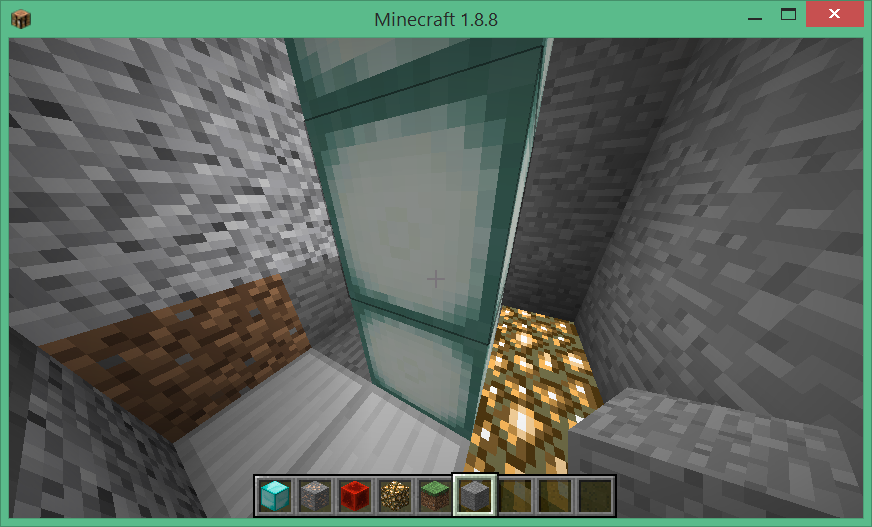
Bricklayer places its orientation marker (i.e., the Glowstone and Iron blocks) in such a way that Bricklayer’s origin (aka the base of the SeaLantern tower) is the block that is adjacent to both the Glowstone and the Iron block. The screenshot below shows the SeaLantern block that forms the base of the tower.
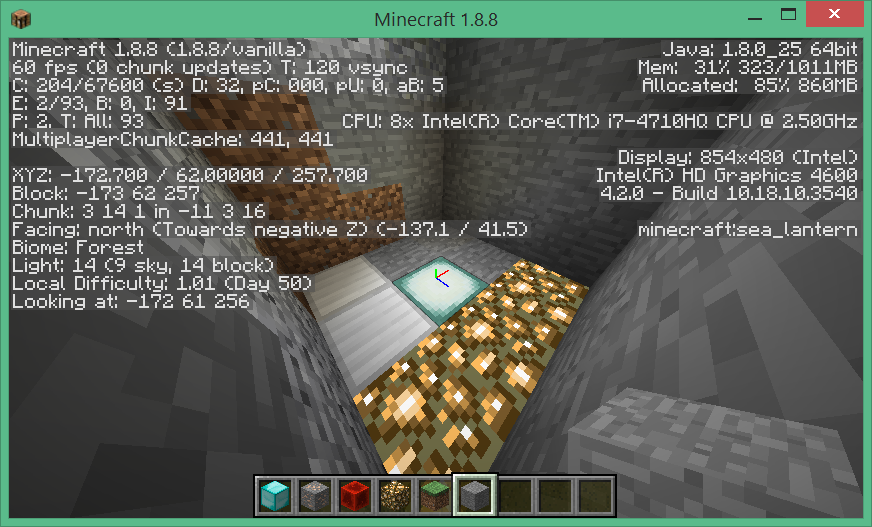
Next, we move our avatar so that it is standing on the base block of the SeaLantern tower. We discover location of this block is (~172,62,256). This is the spawn point of our avatar.

The following function call can be used to inform Bricklayer of our avatar’s spawn point in this Minecraft world.
Aside. The method presented in this code-along for discovering the spawn point of your avatar is (hopefully) conceptually clear. However, it is worth mentioning that there are shorter ways to discover the spawn point of your avatar. we leave the reader to discover how this can be done.
The purpose of the spawn point is to provide Bricklayer with a point of reference which it can use when mapping positions in the Bricklayer coordinate space to the Minecraft coordinate space. Under certain circumstances, approximations to the spawn point might be acceptable. Technically speaking, aside from the y-value of the spawn point, the consequences of approximations are oftentimes not that significant.
Suppose the (approximate) x-value that we use for the spawn point is, say, 2 blocks away from the exact x-value. If we now give the coordinates of another location in our Minecraft (where we want to build) then Bricklayer artifacts will be built 2 blocks off. Unless absolute precision is necessary (e.g., we are building a house on the edge of a cliff) this minor shift is probably not important. Furthermore, such positional errors can also be compensated for using the Bricklayer functions setMinecraftOrigin (discussed below) and setBricklayerOrigin (discussed in the next code-along).
That being said, getting the y-value of the spawn point right is more important. The consequences of overestimating/underestimating the y-value of the spawn point are summarized in the following table.
| Approximation | Consequence |
| y-approximation < y-exact | The base of the Bricklayer artifact will be in the air. |
| y-approximation > y-exact | The base of the Bricklayer artifact will be underground. |
Alternate Approach. Another way to “determine” the spawn point is to actually set it. This can be done using the spawnpoint command on the CanaryMod server. For example, the following command will set the spawn point to the coordinate (~288,62,34).
In this approach, simply (1) navigate to a location in the Minecraft world, (2) use the function key F3 to determine the coordinates of the Block on which your avatar is standing, and (3) issue the spawnpoint command in the command prompt window where CanaryMod is running.
Step 2 – Finding a plot of land on which to build.
Armed with the knowledge of its spawn point, our avatar can now venture out into the Minecraft world in search for a nice plot of land on which we will eventually build some Bricklayer artifacts (e.g., a lava-filled moat surrounding a house/castle/tower).
The following screenshot gives a birds-eye view of the plot of land we have selected.
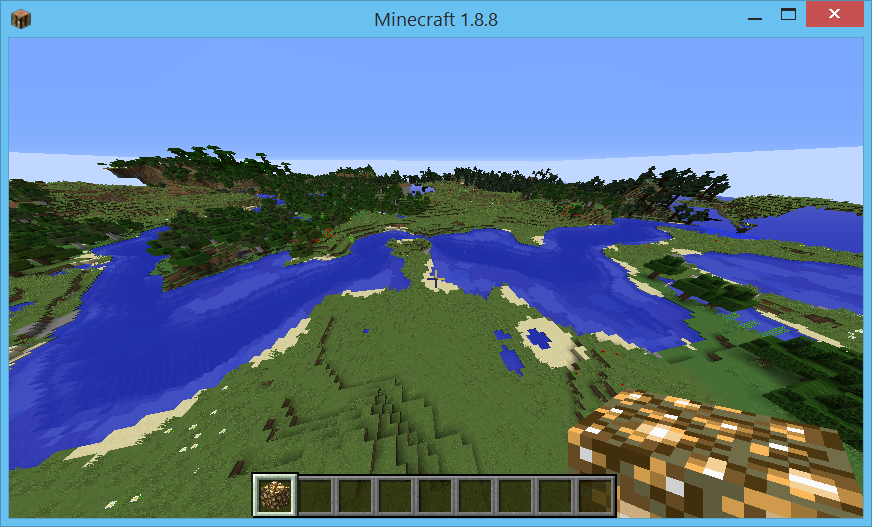
The following screenshot gives a ground-level view of the plot of land we have selected.

Using the function F3, we determine the Minecraft coordinate of the lower-left corner of our plot of land. In this example, the coordinate we will select is (~330,64,~12).

Step 3 – Staking our claim.
Artifacts in Bricklayer’s virtual space are placed in a Minecraft world in the following way: First, Bricklayer determines a point of origin in a Minecraft world, which we will call the minecraftOrigin. Then Bricklayer establishes a correspondence between the origin in Bricklayer’s virtual space (i.e., (0,0,0)) and the minecraftOrigin.
Initially (as a default), Bricklayer assumes the spawn point is the minecraftOrigin. However, as shown in the program below, the minecraftOrigin used by Bricklayer can be moved to any location in a Minecraft world through the use of two functions, setSpawnPoint and setMinecraftOrigin.
The program below, after setting the minecraftOrigin to (~330,64,~12), puts a tower of SeaLanterns at the origin — which in Bricklayer’s virtual space is (0,0,0) and which is our Minecraft world is (~330,64,~12).
One final thing the program below does before creating the SeaLantern tower in our minecraft world is set the position of our avatar, which more traditionally is referred to as our player. The player position is expressed as an offset from the minecraftOrigin.
open Level_4;

val spawnPoint      = (~172,62,256);
val minecraftOrigin = (~330,64,~12);

build(64,64,64);

setSpawnPoint      spawnPoint;
setMinecraftOrigin minecraftOrigin;

put (1,10,1) SeaLantern (0,0,0);

setPlayerOffset (~3,5,~3);

showMC "Stake claim";
The screenshot below shows, in a third-person view (achieved by using the function key F5) the result of executing our program. Note that our avatar is standing on our orientation maker which is suspended in the air – at a height offset of 5 from our minecraftOrigin.

The following screenshot shows the F3 data associated with our avatar. Note that the y-value is 69 which is 64+5, and the z value is ~9 which is ~12 + 3 which accounts for the Bricklayer/Minecraft disagreement on the direction of North. Also note that the x-value is ~334 which is different from the expected value of ~333. This is due to slight variations in how an avatar can be placed. Note that our avatar is standing on a Glowstone block with its right foot and an Iron block with its left foot.

The last screenshot shows the artifact we have constructed (and our orientation marker) from a short distance away. Recall, the Glowstone markers show the direction of the positive x-axis in Bricklayer (East in Minecraft), and the Iron block markers show the direction of the positive z-axis in Bricklayer (North in Minecraft).
