Level_4 is a Bricklayer interface (technically speaking an SML structure) that provides a set of functions for “putting” LEGO bricks in the xyz-space. The most important function in Level_4 is a fully parameterized version of a two dimensional “put” function. This function can be used to specify rectangular bricks of any shape (e.g., 4x1x2) and any type (i.e., any of the brick types supported by Bricklayer). Other important functions in Level_4 include those that create spheres, rings, cylinders and cones.
See Vitruvia Concept 19 for exercises relating to Level_4 functions.
To get (direct) access to all the functions in Level_4, place the following command at the beginning of your bricklayer program:
build : dimensions → unit
The build function is a 3D generalization of the build2D function. This function takes a tuple of the form (x,y,z) as input and creates a virtual cube whose coordinates are in the range (0,0,0), …, (x-1,y-1,z-1). For example, the evaluation of the function call
will create a virtual xyz-cube (e.g., technically speaking a rectangular prism) whose width (x-dimension) is 5, height (y-dimension) is 6, and whose depth (z-dimension) is 7. It is in this virtual space, (0,0,0),…,(4,5,6), that LEGO bricks may be placed. It is only after this function call has been evaluated that you will be able to build things.
show : string → unit
The show function is a 3D generalization of the show2D function. The input to the show function is a string (a sequence of alphanumeric characters enclosed in double quotes) which you can use to give a name to your LEGO artifact. Suppose you created a LEGO structure that looks like a cube. In this case, your show function call might be something like
showVisible : string → unit
In many (most) cases bricks that cannot be seen can be removed from an artifact. This allows larger artifacts to be displayed than would otherwise be possible. Note that LDD has difficulty displaying artifacts containing more than 25K pieces.
When called, the showVisible function will remove all bricks from an artifact created by a Bricklayer program and display the resulting (modified) artifact using LDD.
showLDR : string → unit
When called, this show function will invoke LDraw to view the artifact created by a Bricklayer program. LDraw is able to view larger artifacts than LDD. LDraw can view artifacts containing around 250K pieces.
showVisibleLDR : string → unit
In many (most) cases bricks that cannot be seen can be removed from an artifact. This allows larger artifacts to be displayed than would otherwise be possible. Note that LDraw has difficulty displaying artifacts containing more than 250K pieces.
When called, the showVisibleLDR function will remove all bricks from an artifact created by a Bricklayer program and display the resulting (modified) artifact using LDR.
showSTL_ASCII : string → unit
When called, this show function will invoke the default viewer for Stereo Lithography (STL) files to view the artifact created by a Bricklayer program. On Windows the default STL viewer is 3D Builder. The STL file created is called cube.stl and is located in the lego-models folder. The exact location for a standard install of Bricklayer will be the following:
C:\Bricklayer\UserCode\lego-models\cube.stl
showBinvox : string → unit
When called, this show function will create a binvox file corresponding to the artifact created by the Bricklayer program. Brickr is a tool that can be used to view binvox files.
The file created is called cube.binvox and is located in the lego-models folder. The exact location for a standard install of Bricklayer will be the following:
C:\Bricklayer\UserCode\lego-models\cube.binvox
put : dimensions → brick_type → point → unit
The put function is a 3D generalization of the put2D function.
The function call shown below will put, at the coordinate (0,0,0), a rectangular prism whose width, height, and length are 2, 3, and 4 respectively.
putMultibrick : dimensions → brick_type list → point → unit
The putMultibrick function is similar to the put function with the exception that it takes a list of bricks as its input. In contrast, the put function only takes a single brick as input.
The function call shown below will put, at the coordinate (0,0,0), a rectangular prism whose width, height, and length are 2, 3, and 4 respectively. Furthermore, the artifact constructed will consist of a random selection 1x1x1 BLUE and GREEN bricks. We refer to 1x1x1 bricks as bit bricks.
The putMultibrick function is useful for adding texture to LEGO artifacts.Important: it is worth noting that (1) a brick may appear multiple times in a list, and (2) the EMPTY brick may also appear in the list.
putHollow : dimensions → brick_type list → point → unit
The putHollow function is similar to the putMultibrick function with the exception that it creates a rectangular prism that is hollow.
The function call shown below will put, at the coordinate (0,0,0), a rectangular prism whose width, height, and length are 2, 3, and 4 respectively. Furthermore, the artifact constructed will consist of a random selection 1x1x1 BLUE and GREEN bricks. We refer to 1x1x1 bricks as bit bricks.
The putHollow function is useful for creating larger LEGO artifacts. Rectangular prisims of even modest size are constructed from a large number of 1x1x1 bricks (bit bricks). For example, a solid rectangular prism whose dimensions are (4,6,8) will consist of 4x6x8 = 192 bit bricks. A (40,40,40) rectangular prism wll consist of 64,000 bit bricks. LDD has difficulty displaying artifacts containing more than 20-30 thousand bit bricks. Creating hollow structures enables the construction of larger artifacts. For example, when created using putHollow, a (40,40,40) rectangular prism will contain 6*40*40 – 12*40 + 8*1 = 9128 bit bricks. The formula used to calculate this is an instance of the inclusion-exclusion principle.
line : point → point → brick_type → unit
The line function is a 3D generalization of the lineXZ function.
setMySpace : point → dimensions → unit
The setMySpace function is a 3D generalization of the setMySpace2D function.
showMySpace : unit → unit
The function showMySpace is a 3D generalization of the showMySpace2D function.
setOffset : point → unit
The function setOffset is a 3D generalization of the setOffset2D function.
incOffset : point → unit
The function incOffset is a 3D generalization of the incOffset2D function.
decOffset : point → unit
The function decOffset is a 3D generalization of the decOffset2D function.
sphere : radius → brick_type list → point → unit
The function sphere takes as input (1) an integer radius, (2) a brick_type list, and (3) a point denoting the center of the sphere. When called, this function will create a sphere in the manner specified by its input. It is important to note that the construction of solid spheres require a lot of bit bricks. For example, the call
will create a sphere whose diameter is 2*10 + 1 containing 4945 bit bricks. See the discussion of the circleXZ function for an explanation of why the length of the diameter is 2*10 + 1.
hollowSphere : radius → thickness → brick_type list → point → unit
The function hollowSphere takes as input (1) an integer radius, (2) an integer denoting a thickness (with 10 being the max thickness), (3) a brick_type list, and (4) a point denoting the center of the sphere. When called, this function will create a hollowSphere in the manner specified by its input. For example, the call
will create a hollow sphere whose diameter is 2*10 + 1 and whose surface is solid (containing no gaps). The resulting sphere is composed of 2392 bit bricks. See the discussion of the circleXZ function for an explanation of why the length of the diameter is 2*10 + 1.
ringX : radius → thickness → height → brick_type list → point → unit
The function ringX takes as input (1) an integer radius, (2) an integer denoting a thickness (with radius+1 being the max thickness), (3) an integer denoting a height, (4) a brick_type list, and (5) a point denoting the center of the lower base of the cylinder. When called, this function will create a cylinder along the x-axis in the manner specified by its input. For example, the call
will create a ring whose diameter is 2*10 + 1 and whose surface is solid (containing no gaps) along the x-axis. The length of this ring is 20 bit bricks.
Note that a circle in the yz-plane can be seen as a special case of ringX, where the thickness = radius + 1 and the height = 1.
ringY : radius → thickness → height → brick_type list → point → unit
The function ringY is similar to ringX. The only difference is the ring constructed runs along the y-axis.
ringZ : radius → thickness → height → brick_type list → point → unit
The function ringZ is similar to cylinderX. The only difference is the ring constructed runs along the z-axis.
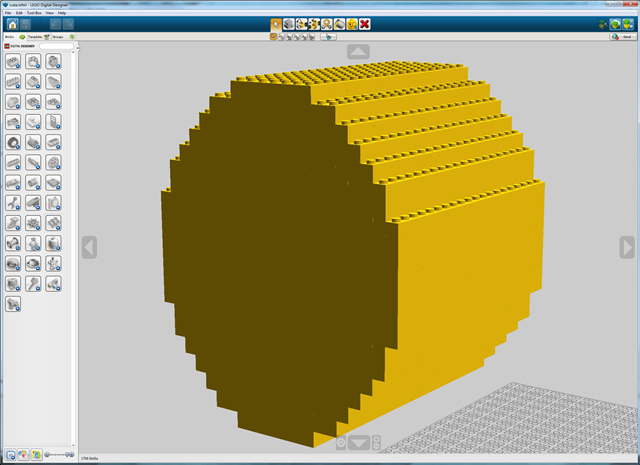
hollowCylinderX : radius → height → brick_type list → point → unit
The function hollowCylinderX takes as input (1) an integer denoting a radius, (2) an integer denoting a height, (3) a brick_type list, and (4) a point denoting the center of the lower base of the cylinder. When called, this function will create a hollow cylinder along the x-axis in the manner specified by its input. When viewed from the outside a hollow cylinder will have the same appearance as a ring whose thickness = radius + 1. For example, the call
will create a hollow cylinder whose diameter is 2*10 + 1 and whose surface is solid (containing no gaps) along the x-axis. The length of this cylinder is 20 bit bricks.
hollowCylinderY : radius → height → brick_type list → point → unit
The function hollowCylinderY is similar to hollowCylinderX. The only difference is the hollow cylinder constructed runs along the y-axis.
hollowCylinderZ : radius → height → brick_type list → point → unit
The function hollowCylinderZ is similar to hollowCylinderX. The only difference is the hollow cylinder constructed runs along the z-axis.
coneX : radius → thickness → brick_type list → point → unit
The function coneX takes as input (1) an integer denoting a radius, (2) an integer denoting a thickness, and (3) a brick_type list. When called, this function will use the bricks in the brick_type list to create a hollow cone along the x-axis. The base of the cone will be on the left (smaller value of x) and the top on the right (larger value of x). For example, the call
will create a cone whose (1) base has its center at (20,20,20), (2) top is at (20+10,20,20), and (3) maximum diameter is 2*10 + 1. The cone will consist of randomly selected BLUE and GREEN bit bricks.
coneNegX : radius → thickness → brick_type list → point → unit
The function coneNegX takes as input (1) an integer denoting a radius, (2) an integer denoting a thickness, and (3) a brick_type list. When called, this function will use the bricks in the brick_type list to create a hollow cone along the x-axis. The base of the cone will be on the right (larger value of x) and the top on the left (smaller value of x). For example, the call
will create a cone whose (1) top is at (20,20,20), (2) base has its center at (20+10,20,20), and (3) maximum diameter is 2*10 + 1. The cone will consist of randomly selected BLUE and GREEN bit bricks.
coneY : radius → thickness → brick_type list → point → unit
The function coneY is similar to coneX. The only difference is the cone constructed runs along the y-axis.
coneNegY : radius → thickness → brick_type list → point → unit
The function coneNegY is similar to coneNegX. The only difference is the cone constructed runs along the y-axis.
coneZ : radius → thickness → brick_type list → point → unit
The function coneZ is similar to coneX. The only difference is the cone constructed runs along the z-axis.
coneNegZ : radius → thickness → brick_type list → point → unit
The function coneNegZ is similar to coneNegX. The only difference is the cone constructed runs along the z-axis.
Example 1
open Level_4;

(* (0,0,0), ..., (39,39,39) *)
build(40,40,40);

put (10,20,30) BLUE (0,0,0);

show "rectangular prism";
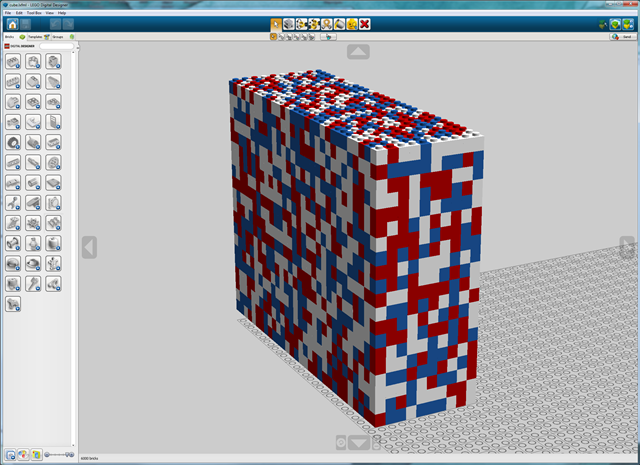
Example 2
open Level_4;

(* (0,0,0), ..., (39,39,39) *)
build(40,40,40);

putMultibrick (10,20,30) [RED,WHITE,BLUE] (0,0,0);

show "Texturing with brick_type lists";
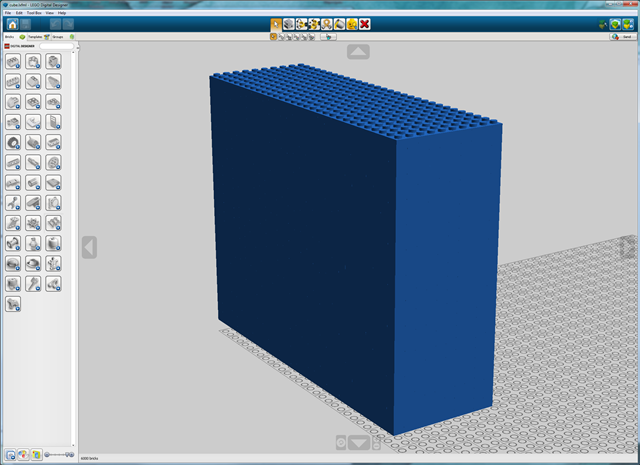
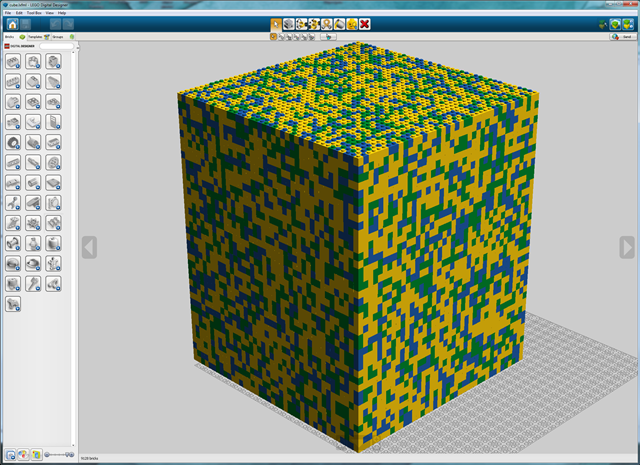
Example 3
open Level_4;

(* (0,0,0), ..., (39,39,39) *)
build(40,40,40);

putHollow (40,40,40)
          [BLUE,GREEN,YELLOW,YELLOW]
          (0,0,0);

show "put hollow";
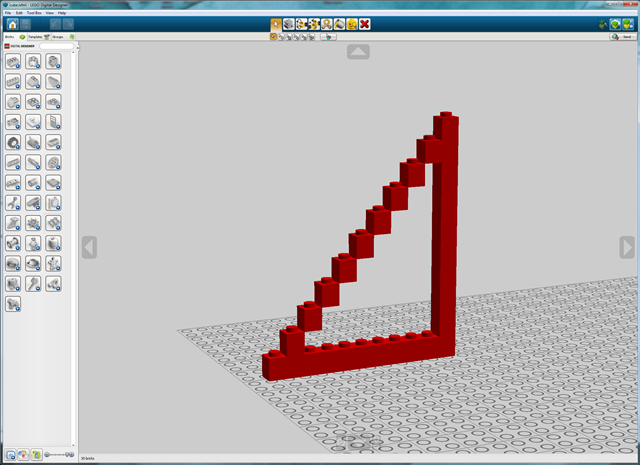
Example 4
open Level_4;

(* (0,0,0), ..., (39,39,39) *)
build(40,40,40);

line (0 , 0,0) (10, 0,0) RED;
line (10, 0,0) (10,10,0) RED;
line (10,10,0) ( 0, 0,0) RED;

show "wire frame";
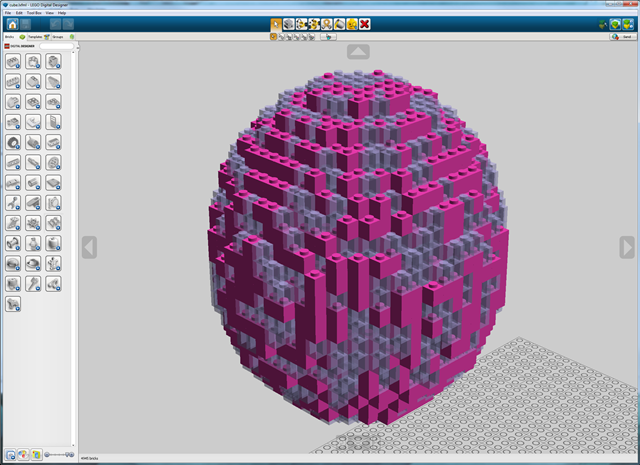
Example 5
open Level_4;

(* (0,0,0), ..., (39,39,39) *)
build(40,40,40);

sphere 10 [PINK,CLEARVIOLET] (20,20,20);

show "sphere";
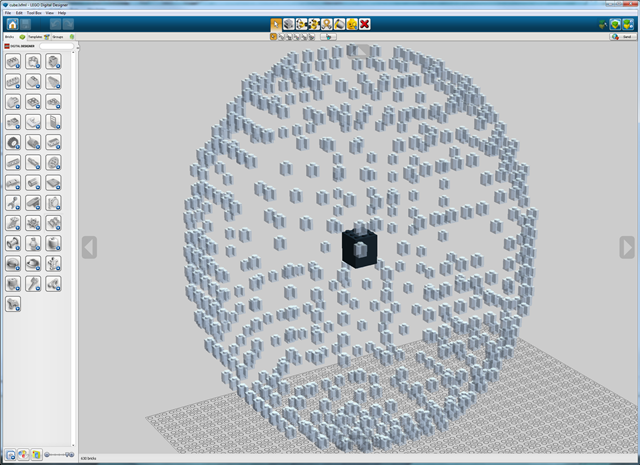
Example 6
open Level_4;

(* (0,0,0), ..., (39,39,39) *)
build(40,40,40);

hollowSphere 20 1 [CLEAR] (20,20,20);
put (3,3,3) BLACK (19,19,19);

show "hollow sphere";
Example 7
open Level_4;

(* (0,0,0), ..., (39,39,39) *)
build(40,40,40);

ringX 10 1 20 [YELLOW] (0,20,20);

show "Ring";
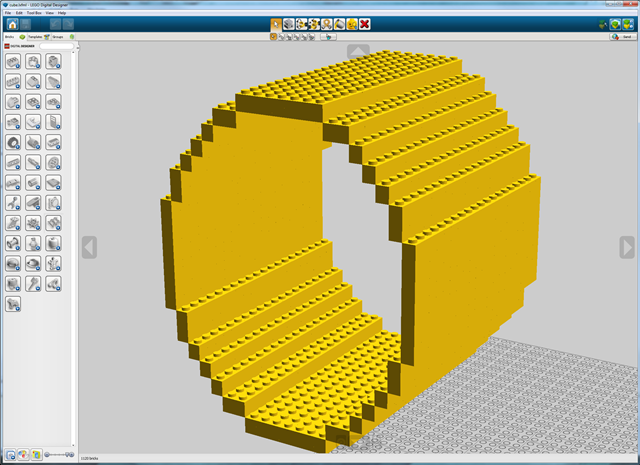
Example 8
open Level_4;

(* (0,0,0), ..., (39,39,39) *)
build(40,40,40);

hollowCylinderX 10 20 [YELLOW] (0,20,20);

show "Hollow Cylinder";
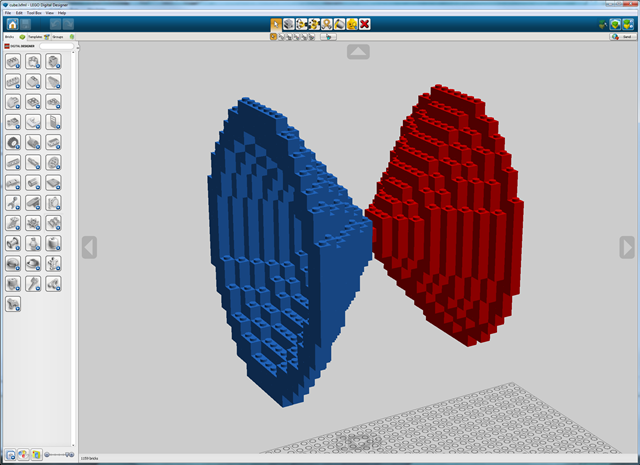
Example 9
open Level_4;

(* (0,0,0), ..., (39,39,39) *)
build(40,40,40);

coneX    10 1 [BLUE] (20,20,20);
coneNegX 10 1 [RED]  (30,20,20);

show "positive and negative cones";